From the News Room
2014 is the 65th release of the TNTgis software family
MicroImages maintains an ambitious software development schedule with a new version of the TNT products coming out every year with new features and improvements. This aggressive schedule allows the company to implement innovative features quickly and be responsive to user requests.
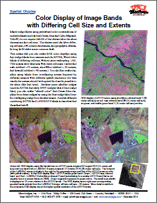
Spatial Display: Color Display of Image Bands with Differing Cell Size and Extents 31 December 2014
Raster image layers using predefined color combinations of multiple rasters (such as Red-Green-Blue and Cyan-Magenta- Yellow) do not require that all of the rasters have the same dimensions and cell size. The rasters used can have differing cell size, row-column dimensions, and geographic extents, as long as all share some common area.
This means that you can create RGB color displays using any image bands from sensors such as ASTER, which have bands of differing cell size, without prior resampling.
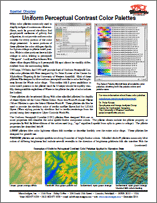
Spatial Display: Uniform Perceptual Contrast Color Palettes 24 December 2014
Many color palettes commonly used to display images of continuous-value surfaces, such as ground elevation and geophysical measures of gravity and magnetics, do not provide uniform color contrast for every portion of the color range presented. In some portions of these palettes the color changes rapidly for a given change in palette index position, while in other portions there is little change in color, leading to perceptual "flat spots". Local surface features with raster value ranges falling in a perceptual flat spot cannot be visually differentiated from the surrounding areas.
TNTmips, TNTedit, and TNTview provide a set of Uniform Perceptual Contrast color palettes that were designed by Dr. Peter Kovesi of the Centre for Exploration Targeting at the University of Western Australia. Each of these palettes was designed to have uniform perceptual contrast in color and brightness across the whole color range. This means that a given separation in color index position in the palette (such as 10 steps) should be equally visually distinguishable regardless of where in the palette the pair of color indices are located.
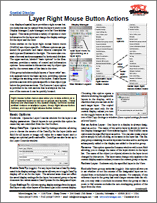
Spatial Display: Layer Right Mouse Button Actions 17 December 2014
Any displayed spatial layer provides a right mouse button menu that can be opened from the layer's entry in the Display Manager (Layer Manager) or in the View sidebar legend. This menu provides a variety of options to view information about the layer and change the display settings for the layer and the view.
Installation and Setup Guide for the TNT Products 3 December 2014
The Installation and Setup Guide for the TNT Products has been updated for v2015. Reference this guide for instructions on installing, setting up your license, and choosing your interface language and fonts.
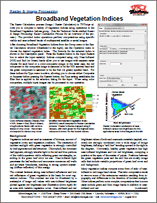
Raster & Image Processing: Broadband Vegetation Indices 26 November 2014
The Raster Calculation process (Image / Raster Calculation) in TNTmips allows you to compute a variety of vegetation indices using operations in the Broadband Vegetation Indices group. (See the Technical Guide entitled Raster & Image Processing: Raster Calculation Process for an overview of the process.) The provided index operations perform computations using specific visible and near-infrared bands of multispectral satellite or aerial images.
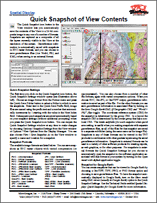
Spatial Display: Quick Snapshot 19 November 2014
• Quick Snapshot of View Contents
• Quick Snapshot for Google Earth
The Quick Snapshot icon button in the
View window lets you automatically
save the contents of the View to a 24-bit composite
image in any one of a number of formats.
Snapshots are captured as a composite of all
the layers currently visible in the View at the
resolution of the screen. Georeference information
is automatically saved with snapshots
in RVC raster formats, and you can choose to
save georeference files (Arc World, PRJ, and
KML) when saving to an external format.

Database: Import or Link to Access and Excel Files 5 November 2014
The Import process in TNTmips allows you to import or link to database tables in Microsoft Access files (.accdb, .mdb) or to Excel spreadsheets (.xlsx, .xls). These operations require a Windows OS and installation of the Microsoft Access Database Engine, which includes the Microsoft ACE OLEDB provider. The Access Database Engine is installed along with Microsoft Office (2007 or later) and Microsoft Access. If you do not have one of these applications installed, you can download and install the free Microsoft Access Database Engine 2010 Redistributable to enable use of Access and Excel files with TNTmips.
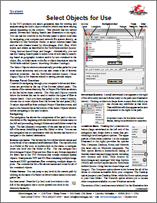
System: Files and Objects 29 October 2014
• Select Objects for Use
• Create Output Files and Objects
In the TNT products you select geospatial data for viewing and
analysis using the Select objects window.
Use the Browse panel to select local data by navigating your computer and network file system (or Internet-based data if adding public or web layers).
Alternatively, use the Catalog Search panel to select local or web data by searching
based on geographic location and/or by text contained in the
object, file, or folder name or the file or object description
TNT processes that create output objects use a variant of the Select
Objects window to allow you to navigate to the desired location
in your computer's file system, create a new folder, select or create
a Project File, and name the output object or objects.
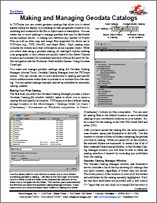
System: Geodata Catalogs 22 October 2014
• Making and Managing Geodata Catalogs
• Searching Geodata Catalogs
In TNTmips you can create geodata catalogs that allow you to select
spatial objects for display or processing by their geographic location and/
or by matching text contained in the file or object name or description.

Spatial Display: Multi-band Image Layers 15 October 2014
• Multi-band Image Layers
• Select Multiple Rasters for Separate, Multi-band, or RGB Layers
When you use the Add icon button on the Display Manager or View window
to select three or more image bands (with matching line and column
dimensions), you have the option to add the rasters as separate raster layers,
as an RGB layer, or as a multi-band layer. Multi-band layers allow changing the band assignments for the color display in Raster Layer Controls.

Spatial Editor: Snap Lines with Step-through Preview 8 October 2014
Vector objects that you create or import may have unwanted gaps between line elements that should intersect. You can use the Snap operation in the Editor's Vector Tools to close these gaps. In this operation you can set distance and angle limits, set the snap type, and apply the operation to all lines or only to active or marked lines or nodes. You can also preview the snap result and step through the gaps to decide on the appropriate action for each case.
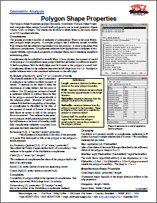
Geometric Analysis: Polygon Shape Properties 1 October 2014
The Polygon Shape Properties process (Geometric / Attributes / Polygon Shape Properties) computes shape metrics for individual polygons in one or more geometric objects (vector, CAD, or shape). The results can be saved in tables added to the input objects or to CSV-formatted text files.
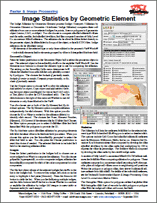
Image Statistics by Geometric Element 24 September 2014
The Image Statistics by Geometric Element process (Image / Interpret / Statistics by
Geometric Element or Geometric / Attributes / Image Statistics) computes raster cell
statistics from one or more selected images for points, lines or polygons in a geometric
object (vector, CAD, or shape). You can choose to compute standard statistical values
such as mean, median, and standard deviation, and also compute a number of Gray Level
Co-occurrence Matrix statistics. The statistics can be saved as tables added directly to
the geometric object, as tables added to a copy of the object, or as text (CSV) files. Image
statistics can be tabulated using:
• all elements of the selected type or only those marked in the process's View window
• individual elements and/or elements grouped by value in a designated attribute field.
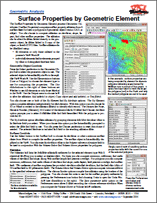
Geometric Analysis: Surface Properties by Geometric Element 18 September 2014
The Surface Properties by Geometric Element process (Geometric / Attributes
/ Surface Properties) computes surface property statistics from a
surface raster for lines or polygons in a geometric object (vector, CAD, or
shape). You can choose to compute statistics on elevation, slope, aspect,
and other surface properties. The statistics
can be saved as tables added directly to the geometric
object, as tables added to a copy of the
object, or as text (CSV) files. Surface statistics can
be tabulated using:
• all elements or only those marked in the
process's View window
• individual elements and/or elements grouped
by value in a designated attribute field.
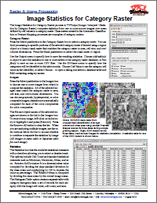
Raster & Image Processing: Image Statistics for Category Raster 10 September 2014
The Image Statistics for Category Raster process in TNTmips (Image / Interpret / Statistics by Category Raster) computes statistics from one or more source images over areas defined by cell values in a category raster. Class rasters created in the Automatic Classification or Feature Mapping processes are examples of category rasters.
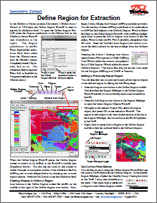
Geometric Extract: Define Region for Extraction 3 September 2014
In the Extract to Vector process (Geometric / Extract from / Vector) in TNTmips, the Define Region window is used to specify an extraction area. To open the Define Region window, press the Region pushbutton in the Extents box on the Extract to Vector window.
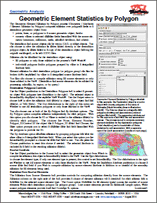
Geometric Analysis: Element Statistics by Polygon 27 August 2014
The Geometric Element Statistics by Polygon process (Geometric / Attributes
/ Element Statistics by Polygon) computes statistics over polygonal areas in a
destination geometric object from:
• points, lines, or polygons in a source geometric object, and/or
• numeric values in selected database fields associated with the source elements
(minimum, maximum, mean, standard deviation, and others).
The destination and source objects can be vector, CAD, or shape objects.
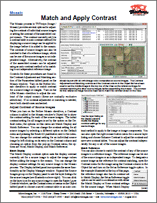
Mosaic: Match and Apply Contrast 13 August 2014
The Mosaic process in TNTmips (Image / Mosaic) provides several options for adjusting the contrast of individual source images or setting the contrast of the assembled output mosaic. The contrast currently set (via a contrast table or auto-contrast method) for displaying a source image can be applied to the image before it is added to the mosaic. The contrast of source images can also be matched to that of a reference image, which can be one of the source images or an independent image. Alternatively, the contrast of the assembled mosaic can be adjusted using an auto-contrast method or by matching to an independent reference image.
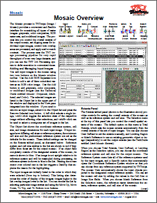
Mosaic Overview 7 August 2014
The Mosaic process in TNTmips (Image / Mosaic) provides a convenient and flexible interface for mosaicking all types of raster images: grayscale, color composites, RGB raster sets, and multiband images. The process lets you control the overall extents of the output mosaic, set clipping areas for individual input images, control how overlap areas are processed, and apply and/or match contrast. The process uses the TNT image processing pipeline for very rapid throughput of even very large datasets, and you can use the TNT Job Processing system to defer execution to convenient times.
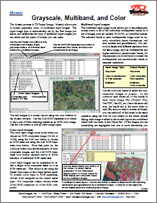
Mosaic: Grayscale, Multiband, and Color 30 July 2014
The Mosaic process in TNTmips (Image / Mosaic) allows you to mosaic grayscale, color, or multiband input images. The input image type is automatically set by the first image you select, and determines the type of additional input images you can select and the types of mosaic you can make.
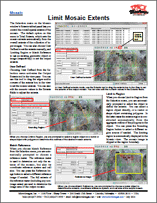
Mosaic: Limit Mosaic Extents 23 July 2014
The Selection menu on the Mosaic window's Extents tabbed panel lets you control the overall spatial extents of the mosaic. The default option on this menu is Total Extents, which sets the mosaic extents automatically from the overall extents of the collection of input images. You can also choose User Defined to set the extents manually, and Limiting Region or Match Reference to use an existing geometric object or image (respectively) to set the output extents.
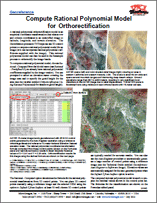
Georeference: Compute Rational Polynomial Model for Orthorectification 17 July 2014
A rational polynomial orthorectification model is an empirical coordinate transformation that relates row and column coordinates in an unrectified image to latitude, longitude, and terrain elevation. The Georeference process in TNTmips can use 3D control points to compute a rational polynomial model for an image (or it can incorporate rational polynomial coefficients supplied with the image). This rational polynomial model can then be used in the Resample process to orthorectify the image bands.
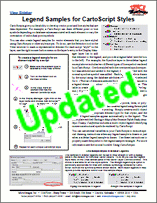
View Sidebar: Legend Samples for CartoScript Styles 9 July 2014
CartoScripts give you the ability to develop vector point and line styles that are data-dependent. For example, a CartoScript can draw different point or line symbols depending on database values associated with each element or vary the orientation of individual point symbols. You can also create legend samples for vector elements that you have styled using CartoScripts or other style scripts. To do so, use the Selection tool in the View window to mark a representative element for each script "style" in the layer, use the right mouse-button menu on the layer's entry in the Display Manager or sidebar legend layer list to add that element to the legend, and provide a legend label.

New Web Reference Layers for Japan 3 July 2014
A variety of new web reference layers for Japan are available for display in the 2015 TNT products. To view any of these web layers, press the Add Web Layer icon button in the Display Manager, then navigate in the Select Objects dialog to the Web / National / Japan folder. The Maps by Geospatial Information Authority of Japan folder includes base maps, color shaded relief, current and historical orthoimagery, elevation data, and subfolders with layers for areas affected by recent natural disasters such as the 2011 Tohoku Earthquake. These web layers are hosted by the Geospatial Information Authority of Japan. The Maps by GSJ of AIST folder includes basic and detailed geologic map coverage of the entire country, produced and hosted by the Geological Survey of Japan, part of the National Institute of Advanced Industrial Science and Technology (AIST). You can overlay any of your own Japan data with these web reference layers in on-screen displays and use them in print layouts.
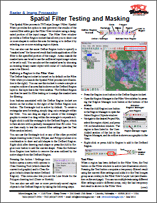
Raster & Image Processing: Spatial Filter Testing and Masking 26 June 2014
The Spatial Filter process in TNTmips (Image / Filter / Spatial Filter) provides the option to test (preview) the results of the current filter settings in the Filter View window using a designated portion of the input image. The Filter View window provides a Define Region toolset that allows you to draw one or more shapes to outline the area for testing or to define it by selecting one or more existing region objects.
You can also use the same Define Region tools to specify a "masked area" for the saved result that limits application of the filter to the specified portion of the image. Areas outside the masked area can be set to use the unfiltered input image values or be set to null. You can also set the masked area by choosing an existing binary raster object with value of 1 indicating the area to be filtered.
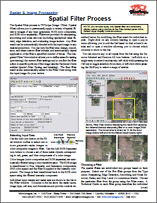
Raster & Image Processing: Spatial Filter Process 19 June 2014
The Spatial Filter process in TNTmips (Image / Filter / Spatial Filter) allows you to permanently apply a variety of spatial filters to images of any type (grayscale, RGB color composites, and RGB color separates). Filters are provided for sharpening, smoothing and noise removal (including specialized radar filters), edge detection, and evaluating image texture. Any filter result can be automatically blended with the input image in any desired proportion. You can vary the filter size; design, import, save, and reuse custom filter kernels; and automatically repeat application of the filter a specified number of times. The integrated Filter View window allows you to define areas for testing (previewing) the current filter settings and to confine the filter action to specific portions of the image.
Map Design: Map Grid Labeling Formats 11 June 2014
This Technical Guide shows some of the many different map grid labeling formats TNTmips provides.
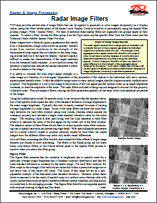
Raster & Image Processing: Radar Image Filters 4 June 2014
TNTmips provides several sets of image filters that can be applied to grayscale or color images temporarily as a Display option (using the Filter tabbed panel on the Raster Layer Display Controls window) or permanently using the Spatial Filter process (Image / Filter / Spatial Filter). For ease of selection these spatial filters are organized into groups based on their purpose. To select a filter, choose the filter group from the Type menu and the specific filter from the Filter menu.
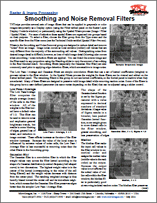
Raster & Image Processing: Smoothing and Noise Removal Filters 28 May 2014
TNTmips provides several sets of image filters that can be applied to grayscale or color images temporarily as a Display option (using the Filter tabbed panel on the Raster Layer Display Controls window) or permanently using the Spatial Filters proces (Image / Filter / Spatial Filter). For ease of selection these spatial filters are organized into groups based on their purpose. To select a filter, choose the filter group from the Type menu and the specific filter from the Filter menu.
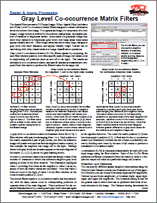
Raster & Image Processing: Gray Level Co-occurrence Matrix Filters 21 May 2014
The Spatial Filter process in TNTmips (Image / Filter / Spatial Filter) includes a set of Gray Level Co-occurrence Matrix filters designed to extract information about the texture of an image. For a grayscale image (or component of a color image), image texture is defined by the amount, spatial scale, and spatial pattern of variation in brightness values. Some areas of a grayscale image may show little variation in brightness (gray level) over large areas; these areas appear visually smooth. Other image areas may show many large changes in gray level over short distances, and appear visually rough. Texture can be used along with other characteristics in image classification operations.
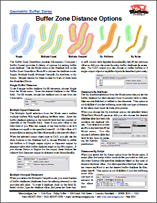
Geometric Buffer Zones: Buffer Zone Distance Options 14 May 2014
The Buffer Zone Generation process (Geometric / Compute / Buffer Zones) provides a variety of options for setting buffer zone distance. Use the Mode menu in the Distance box on the Buffer Zone Generation window to choose the distance mode: Single, Multiple Equal, Multiple Unequal, By Attribute, or By Script.
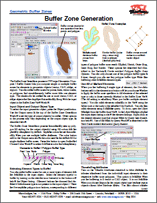
Geometric Buffer Zones: Buffer Zone Generation 7 May 2014
The Buffer Zone Generation process in TNTmips (Geometric / Compute / Buffer Zones) lets you compute single or multiple buffer zones for elements in geometric objects (vector, CAD, shape, or region). You can create buffer zones for points, lines, vector nodes, or polygons, and simultaneously buffer more than one element type. The results can be created as one or more vector, CAD, or shape objects and are displayed automatically along with the input object in the Buffer Zone View window.
Geometric Buffer Zones: Polygon Buffer Zone Options 30 April 2014
The Buffer Zone Generation process in TNTmips provides varied options for generating buffer
zones for polygon elements in geometric objects (vector, CAD,
shape, or region). Even the simple case of a single buffer distance applied
to a polygon can produce different results depending on whether
the buffer is applied to the outside or inside of the polygon
boundary (or both) and on how the buffer operates on the
original polygon area. Buffer operations are:
Expand: original polygon plus outside buffer
Shrink: original polygon minus inside buffer
Outer Ring: outside buffer only
Inner Ring: inside buffer only
Border: outer ring plus inner ring
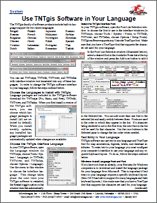
System: Use the TNT Products in Your Language 23 April 2014
The TNT family of software products include built-in language support for two dozen languages: Bengali, Bosnian, Bulgarian, Chinese, Croatian, Dutch, Finnish, French, German, Greek, Indonesian, Italian, Japanese, Malaysian, Norwegian, Polish, Portugese, Romanian, Russian, Serbian, Slovakian, Spanish, Thai, and Turkish.
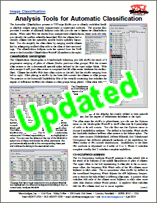
3 UPDATED Technical Guides on Image Classification 16 April 2014
These Technical Guides have been updated to reflect the current edition of TNTmips 2014:
Analysis Tools for Automatic Classification
Merge and Simplify Classes
Create Classification Training Data
7 UPDATED Technical Guides on Job Processing 9 April 2014
These Technical Guides have been updated to reflect the current edition of TNTmips 2014:
TNTmips Job Processing System
Managing Job Processing
Managing the Job Queue
Scheduling Individual and Repeating Jobs
Directing Outputs to Enable Concurrent Job Processing
Custom Job Processing with Geospatial Scripts
What Are Job Files?
Spatial Display: Manual Style Assignment 2 April 2014
In TNTmips you can assign styles to geometric objects in any process with a View window and Layer Controls. Styles assigned by attribute are assigned via a style assignment table that pairs a style with an element attribute. Styles assigned by attribute can be assigned automatically or manually.
Tutorial: Feature Mapping 26 March 2014
The Feature Mapping Tutorial has been completely re-written. Feature Mapping is a unique interactive process that lets you classify multiband imagery using your visual interpretation skills to guide automated classification operations. This tutorial includes examples and step-by-step lessons to help you get started.
Style Editor: Creating Styles for Lines and Polygons 20 March 2014
The Style Editor lets you create and edit styles for points, lines, polygons, and text in vector, CAD, and TIN objects. Set up polygon fill styles with a solid color, bitmap pattern, hatch pattern, or no fill. Create styles with simple solid line colors or complex patterns for line elements and polygon borders.
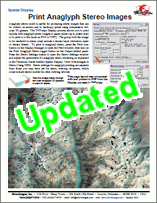
Spatial Display: Print Anaglyph Stereo Images 13 March 2014
Anaglyph stereo mode is useful for producing stereo images that can be viewed on-screen and in hardcopy prints using inexpensive red-cyan 3D glasses. The TNTmips Display process allows you to print layouts that include anaglyph stereo images and render these images to the printed page (up to poster size) in anaglyph stereo.
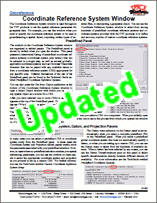
3 UPDATED Technical Guides on Coordinate Reference System Setup 6 March 2014
These Technical Guides have been updated to reflect the current edition of TNTmips 2014:
Coordinate Reference System Window
Custom Coordinate Reference System Setup
Predefined Coordinate Reference Systems
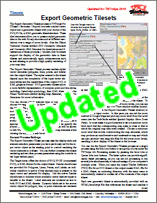
Tilesets: Export Geometric Tilesets 26 February 2014
The Export Geometric Tileset process in TNTmips Pro (Tileset / Geometry / Export) converts a styled vector object into a geometric tileset with your choice of the SVG, SVGz, or KML geometric tileset structure. These tiled structures allow you to present styled geometric data on the web for any size area and at different resolutions over a range of zoom levels. Modern web browsers support the display of the geometric data in these tilesets and automatically apply enhancements such as anti-aliasing to provide a high-quality rendering of your map data.
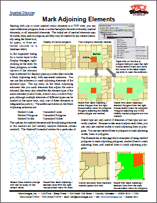
Spatial Display: Mark Adjoining Elements — v2014 19 February 2014
Starting with one or more marked vector elements in a TNT view, you can mark additional polygons, lines or nodes that adjoin the active element, marked elements, or all unmarked elements. The initial set of marked elements may be nodes, lines, and/or polygons, and they may be marked by any means. In the expanded listing for a vector layer in the Display Manager, rightclicking on the entry for lines, polygons, or nodes pops up a menu that includes a Mark Adjoining entry with associated submenu. You can use this submenu to mark adjoining elements of the selected type. The top entry on the Mark Adjoining submenu lets you mark elements that adjoin the active element.
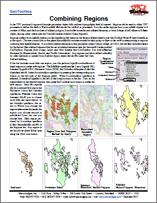
GeoToolbox: Combining Regions — v2014 12 February 2014
In the TNT products a region is a simple geometric object that outlines a geographic area of interest. Regions can be used in many TNT processes to define the area in which spatial data should be viewed or processed. You can create regions from your spatial objects in a number of ways, such as from a set of marked polygons, from buffer zones around marked elements, or from a range of cell values in a raster object, among many others (see the Tutorial booklet entitled Using Regions).
Regions created from spatial objects you are displaying are listed on the Region tabbed panel in the GeoToolbox window. The tree-control list on this panel automatically includes entries for each group or layer in the view (corresponding to regions outlining their spatial extents). If you have marked elements in any geometric object (vector, shape, or CAD), the list also includes entries for the active (last-marked) element and the set of marked elements.
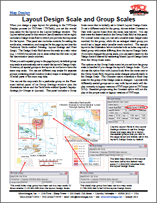
Map Design: Layout Design Scale and Group Scales — v2014 5 February 2014
When you design a page layout for printing in the TNTmips Display process (or TNTview / TNTedit), you set the overall map scale for the layout in the Layout Settings window. The Layout tabbed panel in this window includes a Design Scale field in which you provide the map scale for the layout.
When you add a spatial group to the page layout, its default group map scale is automatically set to match the layout's Design Scale. However, all spatial groups in the layout do not have to have the same map scale. You can set different map scales for separate groups containing small location (index) maps or enlarged maps of small parts of the main map data.
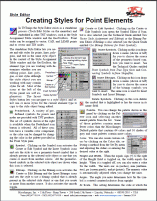
Style Editor: Creating Styles for Point Elements — v2014 29 January 2014
Point styles can be assigned to vector, CAD, and LiDAR points and to vector and TIN nodes. In the Style Editor you can quickly style points from a basic set of predefined point symbols or style objects; import symbols from TrueType, CAD, CGM, ICO and PNG files; and create new symbols from scratch or another symbol.
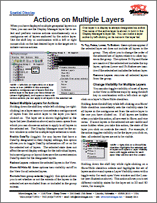
Spatial Display: Actions on Multiple Layers — v2014 23 January 2014
When you have displayed multiple geospatial layers in a View, you can use the Display Manager layer list to select and perform various actions simultaneously on a contiguous set of layers anchored by the active layer. Use the shift key in combination with a left or right mouse-click on the last desired layer in the target set to initiate various actions.
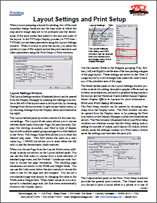
Printing: Layout Settings and Print Setup — v2014 15 January 2014
When you are preparing a layout for printing, two of the most important design decisions are the map scale at which the map and/or image data are to be portrayed and the dimensions of the print media best suited to the size and scale of the layout. In the TNTmips Display process (or TNTview / TNTedit) you set these parameters using the Layout Settings window. When it is time to print the layout, you select the printer (or type of file output) and set the print resolution and other parameters using the Print Setup or Print windows.
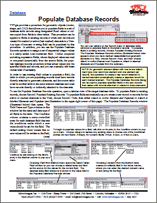
Database: Populate Database Records — v2014 9 January 2014
TNTmips provides a procedure for geometric objects (vector, shape, and CAD) that allows you to populate fields in a set of database table records using designated fixed values or values copied from fields in other tables. In order to use existing field values, the table in which you are populating records must have records directly attached to geometric elements, and the source table must be another table in the same element database and must have records directly or indirectly attached to elements. This procedure can be applied to fields in existing records or when new records are created for marked or active (last marked) elements in a View. Any type of numeric or string field can be populated by this procedure. Unlike computed and string expression fields, whose displayed values are read or computed dynamically from the source fields, the populate database records procedure writes actual values into the specified fields and records, and you can manually edit these values later if necessary.
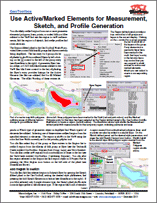
GeoToolbox: Use Active/Marked Elements for Measurement, Sketch, and Profile Generation — v2014 26 December 2013
You can easily create a region from one or more geometric elements (polygons, lines, points, or nodes) that you have marked in the View and use this region to view measurements, add the region to a sketch, and create profiles and cross-sections.
The Region tabbed panel in the GeoToolbox window provides a tree-control that lists all groups and layers as well as active and marked elements.
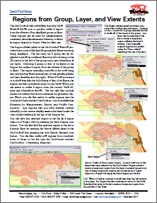
GeoToolbox: Regions from Group, Layer, and View Extents — v2014 18 December 2013
The GeoToolbox that is available from any View window allows you to quickly create a region from the extents of any displayed group or layer. These regions can be used for measurements, combined, saved as elements in a sketch, or saved as region objects in Project Files for later use.
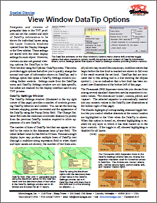
Spatial Display: View Window DataTip Options — v2014 11 December 2013
Designers and viewers of geospatial data in the TNT products can set the content and style of DataTip information to be shown for individual layers using the Layer Controls windows opened from the Display Manager or the View sidebar. These settings are stored with the other display settings for each object. However, viewers can also set general viewing options for DataTips in the View window using the Options / DataTips menu. This menu provides toggle options that allow you to quickly change the amount and type of information shown in DataTips, and a Settings option that opens a DataTip Settings window providing further controls. Settings made from the DataTips menu and DataTip Settings window are not data-specific, but rather are retained for the display interface used in any TNT process.
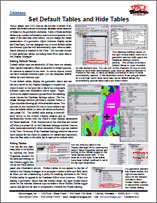
Database: Set Default Tables and Hide Tables — v2014 4 December 2013
Vector, shape, and CAD objects can include a wealth of attribute information stored in multiple database tables attached or related to the geometric elements. Some of these attribute tables may contain information that is more important to the users of the data than other tables. As you design the visual presentation of a geometric object (element display styles and DataTips), you can designate one or more default tables per element type that will automatically open when an associated element is marked in the View. You can also choose to hide particular tables, excluding them from table lists in the Display Manager.
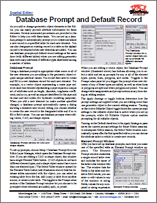
Spatial Editor: Database Prompt and Default Record — v2014 27 November 2013
As you add or change geometric object elements in the Editor, you can easily provide attribute information for these elements. Several automated procedures are provided in the Editor to help you with these tasks. You can set up a database prompt to automatically prompt you to create and attach a new record in a specified table for each new element. You can also designate an existing record in a table as the default record to be attached when new elements are added. You can use database prompts and default record settings at the same time (with different tables) when you are editing geometric data with many attributes of different types distributed among a number of tables.